Have you ever had such an experience?
Every week, I have to send screenshots of the website to the client. First, I have to open the browser, enter the URL, take a full – screen screenshot (and slowly scroll to the bottom), then take a screenshot of the current screen, save them to a local folder, open Dropbox to upload them, and finally write an email, paste the screenshots, and attach the Cloud Drive link… It takes at least 10 minutes to complete this set of operations. If I have to deal with 5 websites this week, an hour will be gone – all mechanical and repetitive tasks, time – consuming and easy to forget steps.
Actually, you don’t have to do these things manually. Recently, I used n8n to build a simple workflow. Just click “Execute”, and it will automatically generate full-screen and normal screenshots of the website, save them to Dropbox, and finally send an email to notify the results.
Complete the whole process of “screenshot – save – send email” in 3 steps
The core logic of this workflow is very simple: after manual triggering, it will automatically run the whole process. Specifically, you only need to do three things:
- Click the “Execute” button (start the workflow) on the n8n interface;
- Fill in the target website URL and receiving email in advance (one-time configuration, no need to change later);
- Wait for the email notification (including two screenshots and Dropbox backup).
No manual screenshots, no file uploads, no email editing – all repetitive operations are automated by the tool.
What problems can it solve?
Don’t think “Auto Screenshot” is a small function. It can actually solve many inelastic demands when you use it.
✅ Scenario 1: Website Monitoring
If you need to check whether the website is normal regularly, use this workflow:
- Triggered regularly every day/week;
- Automatically capture the home page + key pages (such as event pages, payment pages);
- Take a screenshot and save it to Dropbox for backup. Send an email to your inbox.
You don’t have to manually open the website every day to check. If there is an exception, you can directly view the screenshot in the email.
✅ Scenario 2: Customer Delivery
When designers or developers submit websites to customers, they often need to send “screenshots of the current progress”. In the past, they had to manually take screenshots, organize them into documents, and send emails. Now:
- Customer wants a screenshot? Click execute, and the customer will receive an email with the screenshot in their inbox in 2 minutes.
- Screenshots are automatically saved to Dropbox, and historical versions are recorded.
✅ Scenario 3: Competing product material collection
Screenshots of competing product websites need to be collected. Use this workflow:
- List the competing product URLs and process them in batches through the workflow (this article is about a single website, and n8n supports batch input);
- All screenshots are automatically named “Website Name + Date” and stored in the specified Dropbox folder;
- No need to open and screenshot each website, or manually organize files. The team can directly access them on the Cloud Drive.
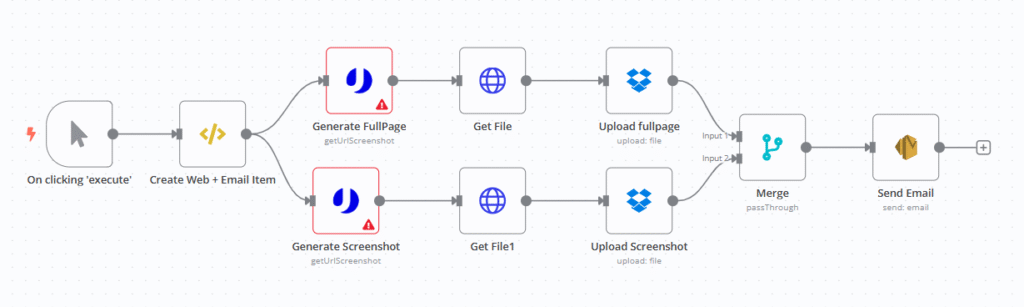
How to build this workflow? 5 core steps
Step 1: Manually trigger
The first node is “On clicking ‘execute'”, which is simple: the workflow starts when you click “execute”.
Step 2: Fill in the target information (website + email)
Next, use the “Data Processing Node” (Create Web + Email Item) to define two key pieces of information:
- Target website URL;
- The email address to receive emails.
Here you need to write a simple line of code
item.website = "website URL";
item.email = "email address";
return item;
Step 3: Call the API to generate two types of screenshots
How do you get the screenshots? Use uProc’s “Website Screenshot API” (a tool specifically for generating screenshots of web pages). There are two parallel nodes here, generating two types of screenshots at the same time:
- Full Page Screenshot Node (Generate FullPage): Configure the parameters: Fill in the website defined in step 2 for the URL, set the width to 640px, and check the “Full Screen Mode” (capture the entire web page, including the scrolled content).
Output: A temporary access link to a full-screen screenshot
- Normal Screenshot Node (Generate Screenshot): It is almost the same as the full-screen screenshot, except that the “Full Screen Mode” is not checked (only the visible area of the current screen is captured). Output: A temporary access link to a normal screenshot.
Step 4: Download the screenshot and save it to Dropbox
uProc returns a screenshot link. We need to download the image file and save it to Dropbox (for long-term backup).
- Download node (Get File + Get File1): Use the “HTTP Request Node” to access the links of the full screen screenshot and the normal screenshot respectively, and download the pictures in the format of “binary file”.
- Upload Node (Upload fullpage + Upload Screenshot): Use the “Dropbox Node” to upload the downloaded binary images to the specified path, such as
/screenshots/sample_fullpage.png(full screen image) and/screenshots/sample.png(normal image).
Step 5: Combine the results and send an email notification
Final step: After both screenshots are uploaded, an email will be sent automatically.
- Merge Node (Merge): Ensure that both the “Full Screen Screenshot Upload” and “Normal Screenshot Upload” branches are completed (to avoid sending an email but not uploading the screenshot properly), and then proceed.
- Email Node (Send Email): Use AWS SES or your preferred email service, and embed two screenshots directly in the content:
- Recipient: The email address defined in Step 2;
- Subject:
Your website screenshot has been generated!; - Body (HTML format):