
Have you ever had this experience? When adding records to an Airtable table, you accidentally clicked “Submit” twice, resulting in two identical records in the table; or you forgot if you had added them before a few days later and entered them again…
Manually check for duplicates? Flipping through data is a waste of time. Ask colleagues for help? You may be afraid of disturbing others. In fact, these “duplicate data” troubles can be solved by building a simple workflow with n8n!
Workflow to share today: Automatic addition of “unique records” in Airtable
In short, this workflow can help you: when adding records to the Airtable table, automatically check whether the “Name field” already exists. If it does not exist, add it. If it exists, skip it. There is no need to manually check the whole process, avoiding duplicate data from the source.
First, check out the result: Achieve “mindlessly adding without duplicates” in 3 steps
Suppose you need to add a record with the Name “n8n” to the “Project Tags” table in Airtable (for example, to tag projects related to n8n). The traditional way to do this might be:
1. Open the Airtable spreadsheet → 2. Search for “n8n” to see if it exists → 3. If not, add it manually.
But with this workflow, all you need to do is:
2. Click the “Execute” button in n8n → 2. The workflow automatically checks existing records in Airtable → 3. Automatically adds (if not present) or skips (if already present).
No need to open Airtable, no need to search manually, duplicate data? Not a chance!
How to build a workflow? Five steps to success
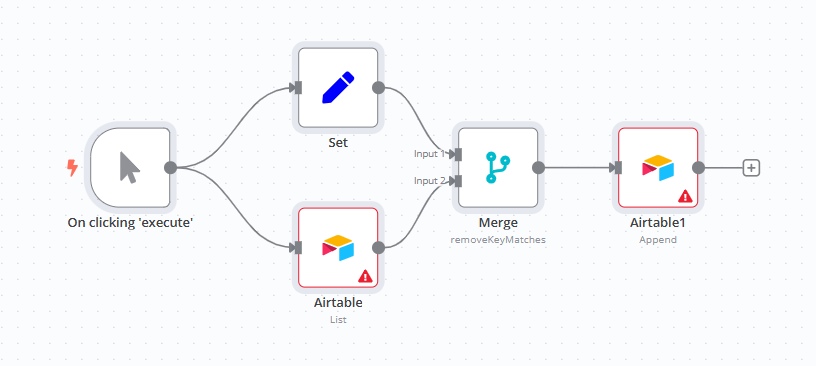
Step 1: Trigger Node – Manually start the workflow
Node type : Manual trigger (On clicking ‘execute’)
Function: The “switch” of the workflow. When you click the “Execute” button on the n8n interface, it starts all subsequent steps.
Configuration : No additional settings are required. Just drag it onto the canvas. By default, it is triggered by “click to execute”.
Step 2: Generate a new record to be added – Set node
Node type : Data setting (Set)
Function: Tells the workflow “what kind of record you want to add” (e.g. Name is “n8n”).
Configuration steps :
1. Click on the node, in the “Values to Set” on the right, select the “string” type, fill in the field name “Name”, and fill in the name you want to add (such as “n8n”);
2. Check “Keep Only Set Values” to ensure that the output data is clean and not redundant, containing only {Name: "n8n"}.
Step 3: Get existing Airtable records – Airtable node (query records)
Node type : Airtable integration (Airtable)
Function: “Fish” out all existing records from the Airtable table to see if there are any duplicates with the records you want to add.
Configuration steps :
1. First, prepare the following in Airtable: the target table (it must have a “Name” field), the Airtable API key (you can find it in Airtable Account Settings → Developer), and the table ID (a string of characters in the table URL, such as appXXXXXXXXXXXXXX);
2. In the Airtable node of n8n, select the operation “List” (list records), and fill in the API key and table ID;
3. Don’t select “Filter by”, let it return all records in the table by default (this way we can check for duplicates in full).
Step 4: Deduplicate and Filter – Merge Node
Node type : Data merge/filter (Merge)
Function: Compare the “new records to be added” with the “existing records” and only keep the records with “no duplicate Name fields”.
Configuration steps :
1. Select “Remove Key Matches” for the node mode;
2. Connect “Input 0” to the Set node (new record to be added), and fill in “Name” (comparison field for the new record) in “Property Name 1”.
3. Connect “Input 1” to the Airtable node (existing records), and fill in “fields.Name” for “Property Name 2” (the Name field of the existing record. In the records returned by Airtable, all fields are stored in the fields object);
4. The node will automatically judge: if the Name of the new record can be found in the Name of the existing record, the new record will be “discarded”; if not, it will be retained.
Step 5: Add a unique record to Airtable – Airtable node
Node type : Airtable integration (Airtable1, distinguished from the node in step 3)
Function: Add the “unique records” remaining after the Merge node filters to the Airtable table.
Configuration steps :
1. Select “Append” for the operation.
2. Fill in the API key and table ID in the same way;
3. Select “Map Input Data” in “Fields”. Map the Name field output by the Merge node to the “Name” field of the Airtable table (if the table has other fields, you can also add them here).
Why this workflow works? 3 core values
1. Say goodbye to duplicate data once and for all : Manual checks always miss something. The workflow compares data using code logic, ensuring 100% accuracy and eliminating the need to delete duplicate records later.
2. Save time on repetitive operations: For example, if you need to add a fixed label every week, it used to take 5 minutes to check and add it, but now you can click “Execute” and it will be done in 10 seconds;
3. Even beginners can reuse it : After configuration, if you want to add records for other names next time, you only need to change the “value” in the Set node without touching other nodes.